SiteLine administrators can add unlimited users to a facility. There are two ways to add users to SiteLine: Add individual Users in SiteLine, Upload a list of users.
This article also explains how to:
Add Individual Users in SiteLine
Use this option when you need to add a small number of users. To begin, open the User Management module from the left Navigation Panel and click the Add Company button.
Note: Users must be linked to a company in SiteLine, so it is best to add Companies first. You can skip down to Add User if you have already added companies.


- Fill in the form with the company name, choose a company type from the list and enter the information for one, or more, offices. Click Create.
- Add Users - Click the Manage Users tab and then click the Add Users button.

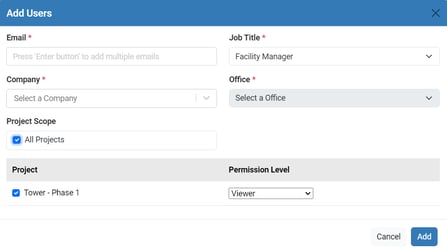
- Fill in the form with the user's email address, choose a job title from the list, select the company and office.
- If you have more than one warranty project active and you want to limit a user's access to a single project, uncheck the All Projects button and make sure that only the project they will access is checked.
- Finally, choose the Permission Level for the user:
- Administrator - *For Contractor Project/Warranty Managers* - All permissions, plus ability to manage documents for the project
-
- Collaborator - *For Contractors* Can create, view and add tickets and manage users
- Requester - *For Owners and Facility Managers* - Can create, view and collaborate on tickets
- Members - *For Trade Partners* - Can view and update tickets assigned to them
- Click "Add" to create the new SiteLine user.
Upload a List of Users
Follow these 4 basic steps:
- Download Sample Spreadsheet
- From the Manage Users tab in the User Management module, click Import Users and then click on Download Sample Spreadsheet. SiteLine will download the add_users_sample.xlsx file to your downloads folder.

Fill in the User List
- Open the spreadsheet file and click on the first tab: Company and User. For each new user, provide the required fields (red column headings in the spreadsheet indicate the required fields).
- Company Name
- Company Type (options provided as a drop down menu in the cell),
- Office Name (give the office a name that will identify it if there are multiple offices)
- Office Address (full postal address),
- User's Email
- User's Job Title (options provided as a drop down menu in the cell), and
- Permission Level (options provided as a drop down menu in the cell)
- Save the spreadsheet file on your hard drive.
- Upload & Preview
-
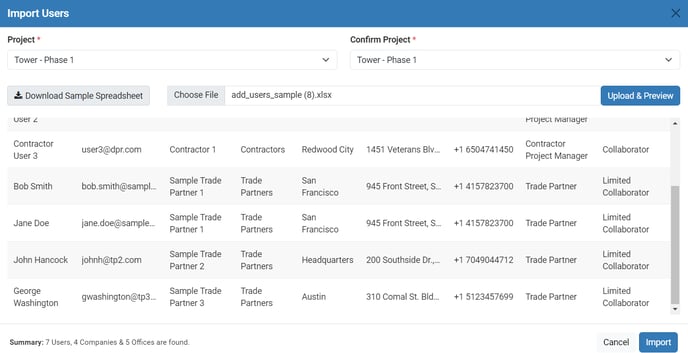
- Select the Project that the users will have access to. Select again to confirm the project.
- Click Choose File and select the spreadsheet you saved.
- Click Upload & Preview
-
- SiteLine will review the user list to make sure the information is complete and formatted correctly. If any errors exist, SiteLine will highlight them. Cancel the import, fix the errors in the spreadsheet and upload again.
- If SiteLine does not find any errors and the information looks correct in the preview window, click he Import button. SiteLine will create the new users and send you an email with a summary of the companies, offices, and users that were imported.
For Single-Sign-On (SSO) accounts, new users will receive an invitation email with a link that initiates the SSO flow. The link redirects to their company login page. On successful authentication, it redirects back to the user’s SiteLine landing page.
See Single Sign On for details.
Re-Invite a User
If a user does not receive an email invitation email, you can return to the Manager Users tab and click the Re-Invite User link.

SiteLine will resend the invitation to the user, which they can use to set up their account and begin using SiteLine.
Edit User's Access
If responsibilities change or users move on to new opportunities, it is easy to manage access to projects SiteLine. Follow the below steps to edit a user's Role, Company, and SiteLine Access.
- Click the EDIT button for user to be updated.

- Update the fields and click the Update button.
Remove User's Access
If responsibilities change or users move on to new opportunities, it is easy to remove access to projects SiteLine.
-
On the Manage Users tab, select the user you want to remove and click the REMOVE button - this will remove users from the project